
Materials:
- A sheet of opaque perspex, larger than the top of your cistern
- A garden tap
- Hose clamps (2)
- Braided house connecter to fit the water outlet near your cistern (long enough to reach the tap. Ours is about 80cm)
- Basin waste attachment
- Plastic container or bowl, to fit the top of your cistern
- Wooden square pole
- 20mm dowel
- Long wood screw
- Large diameter metal washer
Tools:
- Drill with hole-saw attachment
- Jigsaw
- Impact driver or screw driver
- 20mm spade-bit
- Mitre saw or hand saw
- Pencil
- Plumbers tape
- Shifting spanner
- (Optional) Belt sander
- (Optional) Drill-press
- (Possibly) hack saw or angle grinder
Instructions:
1_Cut new cistern lid
- Place the cistern lid on the perspex sheet
- Trace around the lid with a pencil
- Cut along the line with the jigsaw. Cut slowly and carefully.
- Remember to use eye protection and a mouth mask when cutting!
2_Drill a hole through the basin and lid
- Place the plastic container on top of the lid you’ve cut. You may want to use a measuring tape to make sure they are centered.
- With a hole-saw attachment that matched the diameter of the waste-outlet, drill a hole through both the container and the lid. I drilled the pilot hole through both whilst they where on top of each other, then the larger hole separately. Make sure the drill bit and hole saw attachment don’t damage the surface you’re working on (consider drilling on a scrap piece of wood).
- Note: it’s worth looking how your flush mechanism works, and placing the waste outlet accordingly. Ours ended up getting in the way of the flushing mechanism, so we had to angle-grind it down a little.
3_Attach waste outlet
- Push the waste outlet through the holes. A rubber washer came with the outlet, and we placed that on the very top of the thread, so that it sits in the basin.
- Tighten the screw well, so as to avoid leaks.
4_Make the tap stalk
- Cut down the wooden square pole to the height you’d like you tap to stand.
- Using the spade-bit in a drill-press (or drill), drill a hole near the top of the wood.
- I also chose to sand the edges of the wood on the belt sander
- Cut the dowel to the length you’d like your tap to stand over the basin.
- Attach the tap to the dowel with the hose-clamps
- Insert the dowel into the hole you’ve drilled. Drive a woodscrew through the side to hold it in place.
- Apply plumber’s tape to the thread, and firmly attach the braided hose to the tap
5_Attach tap stalk to the lid
- Drill a hole in the lid where you’d like to mount the tap stalk
- With a washer in place, drive the long wood screw through the hole, and into the wooden stalk.
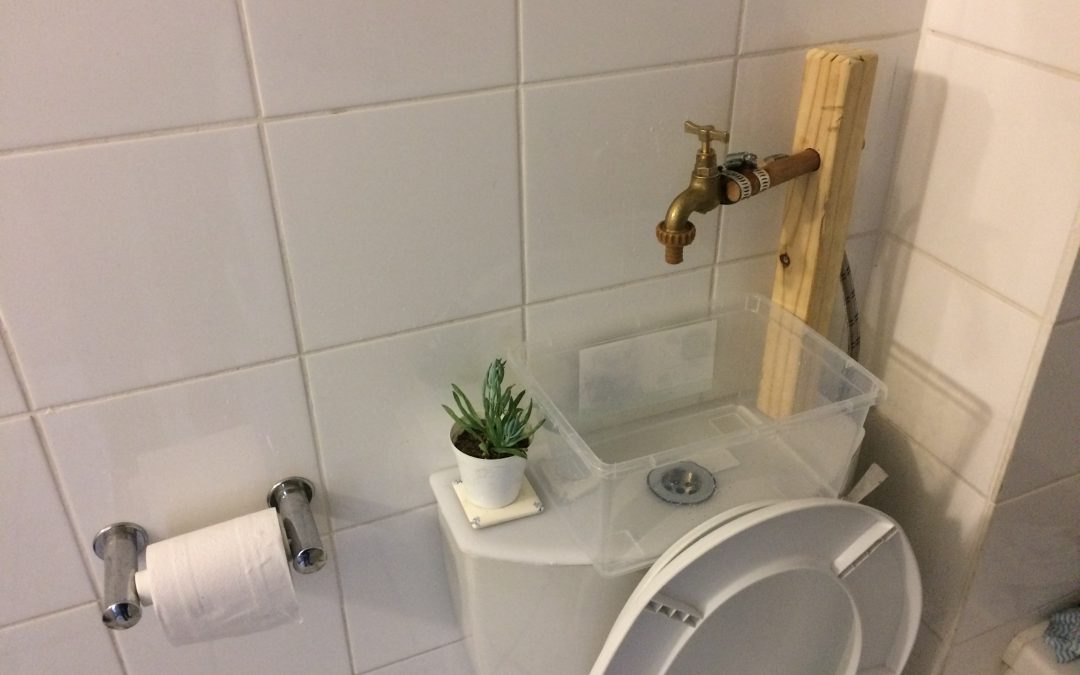
6_Putting everything together
- Turn off the water outlet near the toilet
- Disconnect the existing braided hose from the cistern
- Using a bit of plumber’s tape around the threads, attach the braided house to the water outlet. Use the shifting spanner to make sure it’s tightly connected.
- Slowly turn the water outlet back on, making sure there are no leaks.
- You’re done! Enjoy saving water!
7_Improvements after testing
- Some water creeped under the basin (not much at all). Applying silicone sealant near the waste outlet would solve this.
- The thread at the bottom of the waste outlet was quite long, and it got in the way of the waste mechanism. Placing the waste outlet to the side would’ve avoided this.
- If you have extra budget, you could use a shiny faucet that arches over into the basin instead of a garden tap on some wood