
Materials:
- Ø 20 mm PVC pipe (25 m long),
- 90mm PVC elbow connectors (4 units)
- 20mm PVC T-connectors (20 units)
- glue for PVC 250 gr (1 unit)
- matte black paint
- roller
- sandpaper
- self-amalgamating tape
- 100-litre plastic container
- standard hose (50 m long)
- 2-litre plastic bottles (40 units)
- milk / juice cartons (50 units)
- wooden strips
- screws
- toolbox
- Ø 100 mm PVC pipe or similar (cylindrical) (0.5 m long)
Instructions:
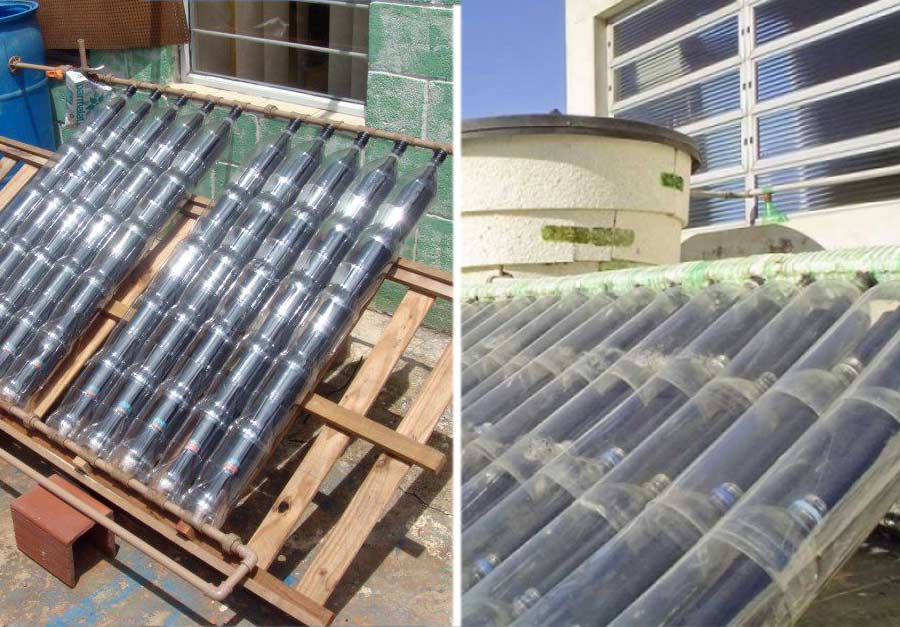
This craft will allow you to heat water for domestic use, thanks to solar radiation, applying the thermosyphon principle, like a conventional solar water heater. How can you do it?
- Make sure the bottles are clean and have no surface damage.
- Use the Ø 100 mm PVC tube as a mold to cut the bottom part of all the bottles. Try to cut them so that one bottle can be inserted into another.
- Cut the Ø 20 mm PVC pipe into pieces of 10x1m (total of 10 pieces) and 20×8.5cm (a total of 18 pieces)
- Paint in black the cardboard or plastic sheet and also the 10x1m Ø 20 mm PVC tube.
- Tuck the bottles into the tube, so that one goes into another, to fully cover the black PVC tube.
- Join the segments with the 20 mm PVC T-connectors using PVC glue 250gr. The upper part will channel the hot water while the lower part will receive the cold water.
- Link 2 black tubes to a 90 degree angle with the PVC elbows and join one part with the bottom of the T-panel, and the other side with the top, so that the cold water enters from the bottom and comes out hot to the end of the system.
Tank installation:
- Place the water tank in a structure 30cm higher than the highest point of the solar panel. Try to protect the tank from direct sunlight, by placing in a shady area or using a cover.
- Punch 5 holes in the tank, placed as follows:
- Two at the top with a tap. Each one will be placed in different parts.
- One in the middle of the tank. This will introduce hot water into the tank.
- One at the bottom. This one will conduct the cold water
- One in the middle of the tank, much higher than hole b.
- Connect the hot water pipe and the cold water pipe to the tank. The cold water pipe must be inserted into the tank.
- Connect the tap and level tap through a valve consisting of a plastic bottle linked to the outlet tap. Connect the shower or inlet plumbing to the tank.
Structure installation:
- Collect or buy small wooden or metal beams about 1m long.
- Measure the final dimensions of the panel (the size should be around 1m x 1.20m) and cut the wooden strips.
- Join the beams in a triangular structure with an angle from the diagonal, depending on the location in your home.
- Make different holes with a drill, so that they approximately fit the pipe position. Put a strip into the hole and prepare four packing rings and nuts.
- Fix the structure to the ground or other surface with screws.
All this effort is worthwhile! You will save money in a few months!